Written By Poptropica Cheats and Secrets
Edited by Fuzzy-B
When you jump out of the blimp you can only go
right, to a line of people waiting outside the Twin Palms Mall. Heading right, you reach the entrance to the Twin Palms Mall, but its
locked. It’s after hours. Head right to the Security Office door and
click on the red button and they’ll tell you the Mall doesn’t open until
7am. Continue right to the Parking Lot where you’ll find
Gus, a crying security guard. Talk to
Gus and he tells you that he’s been fired after 10 years on the job and
that the mall isn’t safe, then he walks off to the right. Go right to the
PrintFax car and talk to the kid who tells you that it’s too bad about
Gus, but the stress must have been too much for him. Then he drives
off. Keep going right until you run into a guy in a Yankees hat, the
owner of Slugger’s Store. He suggests that you talk to the mall manager
and apply for the job of night-time security guard. Head back to the Mall. On Main street, go back to the Security Office
door and click the red button. The manager asks if you’re here for
the night watchman job. Then she leads you through the security office
and into the Mall Atrium. She needs to test you to see if you’re
qualified for the job.
An image will appear that you have to study. Then another
will appear and you have to click on the 5 differences. You can toggle
back and forth between the images, so it’s not too challenging. The
differences between Photo #1 and #2:
- Dr. Hare t-shirt design (second from right in second row down)
- Turquoise belt on wall
- Disco light
- Yellow star on red t-shirt on rack
- Jeans on floor point a different way
Next the manager wants to test your ability to patrol. She tells you
to jump on the scooter and patrol the mall looking for trouble. She’s
set up robots to test you:
- In front of the Chinese Food kiosk are two robots, a boy
and a girl. Click on them to tell them “no loitering” and shoo them
away. Roll right past the escalator to the next area called Mall Right.
In Mall Right, roll past the elevator and you’ll come across a robot granny in front of a New Store Coming Soon! sign.
- Say hello to Granny, then keep rolling right
- At the escalators, you’ll find a robot boy trying to run
up the down escalator, click on him to scold him for running up the
escalator. Roll back left to Granny.
- You’ll see a robot burglar grab Granny’s purse. Quick, get after him! Head left back to the Mall Atrium
You’ll run over the robot thief, but the Manager gives you the job.
Congrats. The manager gives you a Security Guard Badge and sends you
to the Security Office to start your shift. Put on the Badge.
Congratulations, you’re now a night watchman!
An Alert appears on the huge security screen: “Disturbance in MacGuffin’s!” Before you investigate, check out the office:
- energy drinks on the console – the manager warned you to avoid these
- a corkboard – notes from Gus, the paranoid night watchman
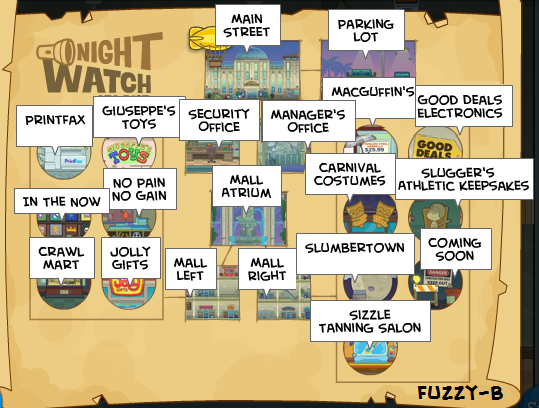
- a map of the mall – a great resource for finding what you need. In this case, MacGuffin’s is on the 3rd floor in Mall Right
 |
| Here is a copy of the map. It comes in handy when looking for shops. |
Exit into the Mall Atrium. Run right to Mall Right. Click on the
elevator button. Enter the elevator. When it drops you off at the 2nd
floor, hit the elevator up button and re-enter the elevator. You’ll
jump off at the 3rd floor. Head right to MacGuffin’s. Enter.
Inside MacGuffin’s are all kinds of strange electronics. Head left
until you see a “Ringing” coming from a Quake-Master massage chair.
Click on the chair to get the SMART PHONE. Answer the incoming call.
It’s from Gus! It’s his phone that he lost. He says it’ll come in
handy with thieves about. He teaches you the different apps.
Smart Phone Camera LIVE Security Feeds:
- MacGuffin’s Gadget Store
- Good Deals Electronics Shop
- In the Now Clothing Store
- CrawlMart Pet Shop
- PrintFax Print Shop
- Slugger’s Athletic Keepsakes
- Slumbertown Mattress Store
- JollyGifts Gift Store
- Sizzle Tanning Salon
- Giuseppes Toy Store
- Carnival Costumes
- No Pain, No Gain Sports Fitness Store
Leave MacGuffin’s and you’ll see your phone has an Alert.
You now...
- Click on the flashing phone icon. This first alert is: “Security Alert in Slugger’s Athtletic Keepsakes!”
- Then click on the “View Camera” button.
- Using the security camera feed, scroll along the bottom of the room
until the box is blinking and turns red. You’ll see some upended boxes
and a football helmet.
- At this point, Gus appears to give you the next piece of information. In this case, Gus tells you to call the owner.
Go to the Contact List app on the phone and call Slugger’s owner.
He’ll tell you that you need to check to see if his Honus Wagner
vintage baseball card, the most valuable card in the world, is okay.
It’s in a safe behind a statue and the combination is 6723.
Go down to the 2nd level and Enter Slugger’s. Go to the the right of
the store and click on the Statue that says “Take a picture with the
champ!”. You’ll push the statue to the side, revealing the safe. Click
on the safe and enter: 6723. The safe will open. Grab the Baseball card. Then call Slugger's Owner. He is relieved that his card wasn't stolen.
Click on the safe again to return the card, then click on the statue to push it back in place. Head back to the Mall Atrium.
ALERT: Giuseppe’s Toy Store! On the camera feed, use your mouse to
scroll to the top of the screen to the overhead light. When you’ve hit
the right spot, Gus will appear and tell you that the light being on is
odd and you should check it out.
Run left to the area Mall Left. At the elevator, press the button and
head up to the 3rd floor. Head left, remember to jump over the space
where the escalator is, and enter Giuseppe’s. Inside Giuseppe’s, click
on the red TOY BIRD to grab it. On the floor is a ROBOT TOY, grab it
too. Seems the robot might have set off the lights.
Exit the store and head back to the Atrium.
ALERT: Sizzle Tanning Salon! Zero in on the closed tanning bed, the
one on the left. Gus will tell you he thinks he knows what’s going on.
Run to Sizzle, in Mall Right on the 1st floor. Inside Sizzle, click
on the left hand tanning bed. An overly tan woman says she just wants to
stay a few more minutes, even though the mall is closed. Leave Sizzle.
ALERT: Good Deal Electronics! When you start to look around with the
live feed, the signal is lost! Gus tells you someone is in the mall
and doesn’t want you to see.
Head to Good Deal on the 3rd floor of Mall Right. Inside Good Deal, head left and your phone will ring.
CALL: It’s Gus, who tells you that he could have sworn he just saw someone in the store.
To the left is an employee only room, but it’s locked. Exit the store and go back to the Atrium.
ALERT: Crawl Mart! Move the camera to the far right. Gus confirms that the coral snake is missing!
Use your phone contact’s list to call the Pet Shop owner, who tells
you that the snake, Eddie, might be hiding behind his favorite rock in
his glass case. Head to Crawl Mart on the 1st floor of Mall Left.
Inside
Crawl Mart, go to the snake’s empty terrarium at the far right.
CALL: Crawl Mart Owner will tell you that you might be able to lure
Eddie out with his favorite snack, just don’t use any of the store’s
birds.
Exit the store, where you’ll see Eddie, a moment before he takes off.
Go after him. Follow him to the following locations where he’s
hiding. The item he’s hiding in will be shaking. Click on the item and
he’ll take off.
- MacGuffin’s – a Pocket-Sized Porta-Potty
- Sizzle Tanning – the right-hand tanning bed
- Finally, you’ll find him in the Chinese Food kiosk in the
Mall Atrium, where he’s ducked down behind the counter. Go into your
backpack and use your TOY BIRD.
Eddie will eat the bird and take off again.
CALL: The owner tells you not to worry about it, he’ll get Eddie in the morning.
Head to Mall Right.
ALERT: Carnival Costumes! Once again you’ll lose the signal and need to go investigate.
Head up to the 3rd floor. Inside Carnival Costumes, go to the far
left. There’s the costume for the cop and the one for the robber.
Wait, that’s a real robber! He’ll knock you down as he’s escaping.
CALL: Gus tells you the thief is probably after the Quick-Charger
gadget. He tells you to go to MacGuffin’s and stop moving so the lights
turn off. You might be able to ambush the thief.
Following his instructions, enter MacGuffin’s. You’ll hide in the
corner and the lights will go out. The burglar will sneak up and you’ll
surprise him. When you do, he’ll drop a BACK ROOM KEY. Pick it up and
go to Good Deal Electronics on the same floor. Go to the locked
Employees Only door at the far left of the room. Go into your backpack
and use your ROBOT TOY. He’ll keep the light on for you. Now use your
KEY and enter the room.
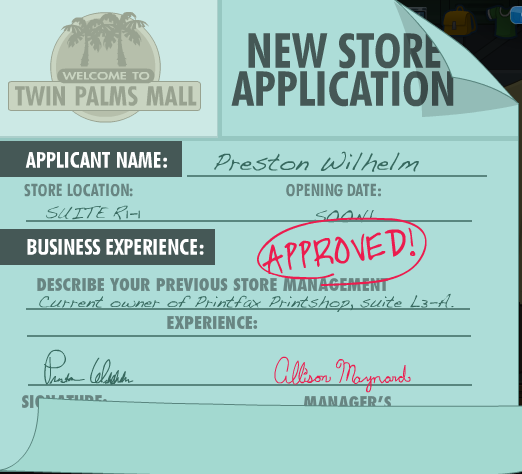
Inside the backroom, you’ll see a familiar apartment background
(hmm…) and a computer with a note on it.
Click on the note and you’ll
see it’s a New Store Application:
CALL: Gus suggests you check out PrintFax (Mall Left, 3rd floor.)
As you get to the 3rd floor, the thief comes barrelling out in a
security golf cart, rides down the escalators, and heads to the Atrium.
CALL: Gus tells you there’s a scooter you can use to chase after him
in the Manager’s Office. (How does Gus know everything that’s
happening to you? Weird.) Anyway, he sends you a list of possible
passwords to the Notes app on your phone.
The Manager’s Office is on the 2nd floor of the Mall Atrium. To get
to the office, run up the escalators at the right-hand side of the
Atrium. The thief will appear and run over you again if you hang out in
the Atrium too long. Time to get that scooter! Enter the Manager’s
Office. Click the control panel for the scooter. The password is
FROST. Unfortunately, the scooter needs to be charged. But how can you
possible CHARGE the scooter QUICKLY? Hm. Wait, a minute…get to
MacGuffin’s!
Inside MacGuffin’s, grab the QUICK-CHARGER. After all, you’re on
official business. Go back to the Manager’s Office in the Atrium. Use
the QUICK-CHARGER out of your backpack. Now jump on the scooter and
exit the office. Take the down escalator to the first floor, go right
to Mall Right, then turn around and go back into the Atrium. You’ll
find out that the best way to catch the thief is to get behind the up
escalator as he’s coming down. So, go to the far left of the Atrium.
When he comes down in his golf cart, you’ll take off after him and
he’ll crash.
But wait, he’s a robot! You’ve been duped.
CALL: Gus tells you that you really blew it. Thanks Gus.
Go to Mall Right
ALERT: PrintFax Print Shop! The live feed shows the thief photocopying something. Get to PrintFax, stat!
Inside PrintFax click on the copy machine. Click Menu, then Reprint
Last Scan, then the green Print button.
It’s a copy of the Honus Wagner
baseball card.
CALL: Gus wonders where the real card is. Time to return to Slugger’s.
In Slugger’s, click on the statue. Uh-oh.
CALL: You tell Gus it looks like the safe fell out of the wall into
the floor below. He tells you to get the blowtorch from behind the
picture in the Manager’s Office to use to cut through the padlock on the
New Store. Head to the Office pronto.
Inside the Manager’s Office, click on the framed picture of the robot
boy over the “employee of the month” sign. Grab the BLOWTORCH. Then
head back to Mall Right. Go to the New Store front and equip the
BLOWTORCH out of your backpack. Click enter to go into the New
Store. Inside the New Store you find the thief. But he escapes up the
wall before you can stop him. Jump up the ladder and click “go up” at
the top.
You’re inside an air vent. You see the thief, but you can’t get by a
red barrier. Equip your BLOWTORCH again and click on the barrier to
torch it. Continue right and then up the ladder until you’re in a room
with Ventilation System A and Ventilation System B written on the wall
behind you.
You’ll start on the right side navigating through System B.
Jump right, over the rotating fan, into the vent. Torch the
barrier. Head right, drop down, and torch the next barrier. Continue
right, up the ladder to the top where it says “danger:
elevator/escalator drive mech.” You’ve caught up to the thief, but he
takes off again. Use your blowtorch on the barrier above you, then jump
up. Travel left across the top of the red barriers then blowtorch the
barrier you’re standing on when you’re past the moving machinery below
you. Drop down and you’ll catch up with the thief again, who bumps you
off the platform.
Go back through vent System B you just went through, but this time
stop halfway up the ladder. You’ll see a beige barrier on your left.
Torch it and step into the darkened vent shaft labelled “B”.
A fan will blow you up to the next level where you’ll find a switch
with “A/C” on it. Torch it. The thief will tell you it’s not over.
Head back to the center Ventilation room and head left. The moving
fan will keep you afloat while you torch the beige barrier into the
System A vents. Head left then drop down the ladder. At the bottom,
you’ll encounter the thief yet again. He’ll run up a ladder.
There’s an “A/C” switch on your right and a barrier on your left.
Torch the switch, then torch the barrier. Go left and torch the next
barrier. Head up the ladder. When you get to the top, torch the
barrier and drop down into the room. “Gotcha, you’re trapped now!”
you’ll say. AGAIN, the burglar takes off.
He jumps down, but you’ve torched the System A “A/C” so he crashes
down and drops the Honus Wagner baseball card. You grab it and the two
of you crash out of the large vent onto the Mall Atrium’s humungous
fountain.
Just when you think he’s going to run away again, Eddie comes by on
the scooter and knocks you the thief silly. You all end up on the floor
of the Atrium. Gus has called the real cops and they unveil the thief.
Of course, it’s Dr. Hare! No, it’s really the print shop owner, as
you’ve suspected since you saw his name on the new store application.
Right?
CONGRATULATIONS! You got the burglar, saved the priceless baseball
card, earned the undying respect of Gus and the Manager and and got your
island medallion!
Scattered around the mall are 9 collectible cards – Canada’s best
athletes from the ‘60’s! You’ve got to recover them. As you leave the
Atrium, follow this order:
- No Pain, No Gain – Left Mall, 2nd floor – far right of the
room, the baseball shooter, the card is up on the rack of clothes,
click on a baseball bat from the rack, then click on the shooter, now
quickly run back and face the shooter just to the right of the rack.
Hit the spacebar as the balls come at you and you’ll knock the card
down. Easy peasy.
- In the Now – Left Mall, 2nd floor – click on the large speaker to the left of the “Get in the Now” sign
- Crawl Mart – Left Mall, 1st floor – in the piranha tank on
the second level, you need to click on the card just as all of the
piranha are moving away from it
- JollyGifts – Left Mall, 1st floor – click on the exploding confetti can on the checkout counter, second in from the left
- Go back to the Atrium and leave the mall through the
security office, jump up to the top of the mall dome and the card is on
the top. Head back inside.
- “Saturn” – Mall Atrium, above the fountain – jump up the
fountain and its on the middle planet, on one of “Saturn’s” rings. From
here you can actually jump to the pizza kiosk to the right.
- Space Time Pizza – Mall Atrium, 2nd level on the right –
click on the lump of dough closest to the oven and quickly click on the
card behind it.
- Sizzle Tanning – Mall Right, 1st floor – click on the
control panel of the first tanning bed until its on the lightest
setting, simmer. Then click on the tanning bed.
- Slumbertown – Mall Right, 2nd floor – use the sleeping
masks cabinet to the left of the exit to jump up to the mattresses on
the next level. Use the blue mattress to jump up onto the big purple
mattress that’s at an angle. When you reach the floor, you’ll run back
and see the card on the upper platform.
Head to Slugger’s to talk to the owner and return the missing cards. As a reward you get the Old-time Baseball Uniform!


